Half-Life is a famous first-person shooter released in 1998. These days Half-Life has a vibrant speedrunning community where players try their best to complete the game as fast as humanly possible. Single-sitting speedruns, when people play through the game from start to finish, are usually streamed and recorded live. But segmented or tool-assisted speedruns—big projects that take weeks or months to complete—use demo files, which capture player actions and can be played back in-game. The demos are recorded to videos post-factum, typically at high resolution and quality. This video recording of demos can be done faster than real-time, which can save multiple real-life hours.
In this post I’ll show how I implemented a tool capable of recording 1920×1080@60 Half-Life footage at up to 3 times faster than real-time on a reasonably powerful PC.1 The tool uses the Vulkan graphics API to capture the game’s frames and convert their color space before encoding.
I’ll also show an example of how to share an image between OpenGL and Vulkan, as the information on this admittedly uncommon use-case is still rather scarce.
Recording a 1920×1080@60 video of a Half-Life speedrun demo in 3× real-time
Specialized Recording Tools #
One question you might immediately ask is: why is a special tool needed for recording video game footage, what’s the difference from screen recording tools like Open Broadcaster Software? The answer is that while those tools are great for live video recording, when dealing with in-game demos, we can do much better. In-game demos contain gameplay recordings and can be deterministically played back at any speed, which means that:
- We can record them into videos much faster than real-time because we control the demo playback speed.
- We can set the target video frame-rate and record at that frame-rate exactly, guaranteeing there are no frame drops, even if the computer can’t keep up in real-time.
- We’re not wasting any performance while recording: every single frame the game draws goes into the video.
- We can add special effects, for example motion blur by recording at a much higher frame-rate and blending the frames together.
Prior Art #
The most well-known Half-Life video recording tool is Half-Life Advanced Effects, or HLAE for short. It has lots of movie-making features, such as custom camera paths or depth map dumping, but its video recording is fairly basic. HLAE gets the frame buffer contents with glReadPixels and passes them to FFmpeg for encoding.
HLAE implemented the FFmpeg encoding only in summer of 2020. Prior to that it would dump every single frame as a TGA file, which was a big recording performance bottleneck and lead to massive disk space consumption (uncompressed frames weigh a lot!). With FFmpeg the performance is much better, but still far from optimal.
Another video recording tool is my previous project, hl-capture. It used OpenCL to capture frames and convert them to a YUV color space, then passed them to FFmpeg for encoding. The performance was very good, but due to lack of OpenCL-OpenGL interoperability implementation in Mesa, this fast path only worked on NVIDIA GPUs.
Implementation #
I implemented the video recording on top of bxt-rs, a base library which hooks into the Half-Life process and provides utilities for intercepting functions and interfacing with the game. I won’t go into too much detail here; the main point is that bxt-rs allows me to add in-game console commands and run my own code when the game calls some function.
Overview #
Video recording comprises several steps. After Half-Life draws a frame with OpenGL, we need to take the frame’s pixel data, feed it to a compute shader which will convert the colors from RGB to YUV, then send the YUV frame to an FFmpeg process for encoding.
To make recording as fast as possible, we want to overlap the maximum amount of work with the game rendering the next frame. To do that, the only operation we will do on Half-Life’s main thread is copying the frame contents into our own GPU buffer. The game will then continue working on the next frame, while we process the recorded contents on a second thread. Luckily, Vulkan was designed with multithreading in mind and provides the necessary guarantees and synchronization primitives.
All operations on the second thread use Vulkan. We will create a Vulkan image for storing the pixel data and share it with OpenGL on the main thread. Once the main thread copies the frame contents into that image, the second thread will run the color conversion compute shader, transfer the result from the GPU memory into RAM and send it off to FFmpeg.
Choosing the Vulkan Crate #
In my past Rust projects I used both raw Vulkan bindings and vulkano. The raw bindings were, expectedly, way too verbose and boilerplate-heavy. Vulkano on the other hand was very nice to work with, however for this project I wanted a lower level of control to better understand the inner workings of the system I was building. Besides, the external memory extension that I was planning to use for interoperating with OpenGL is rather new, and Vulkano hasn’t yet added support for it. Thus, for interfacing with Vulkan, I went with the ash crate.
Ash turned out to be the perfect fit for the project. It is essentially the raw Vulkan API, made as convenient as possible to use from Rust. Ash had only partial support for the external memory extension, but due to the low-level nature of the crate, I could use the underlying Vulkan functions directly for the parts that ash didn’t have wrappers for.
Choosing the GPU #
As a small aside, I don’t recommend tinkering with Vulkan on AMD (at least on Linux) because the drivers, following Vulkan’s raw nature, do only a bare minimum of checks. Practically, this means your session will crash very frequently, leaving you with a pretty picture like this:
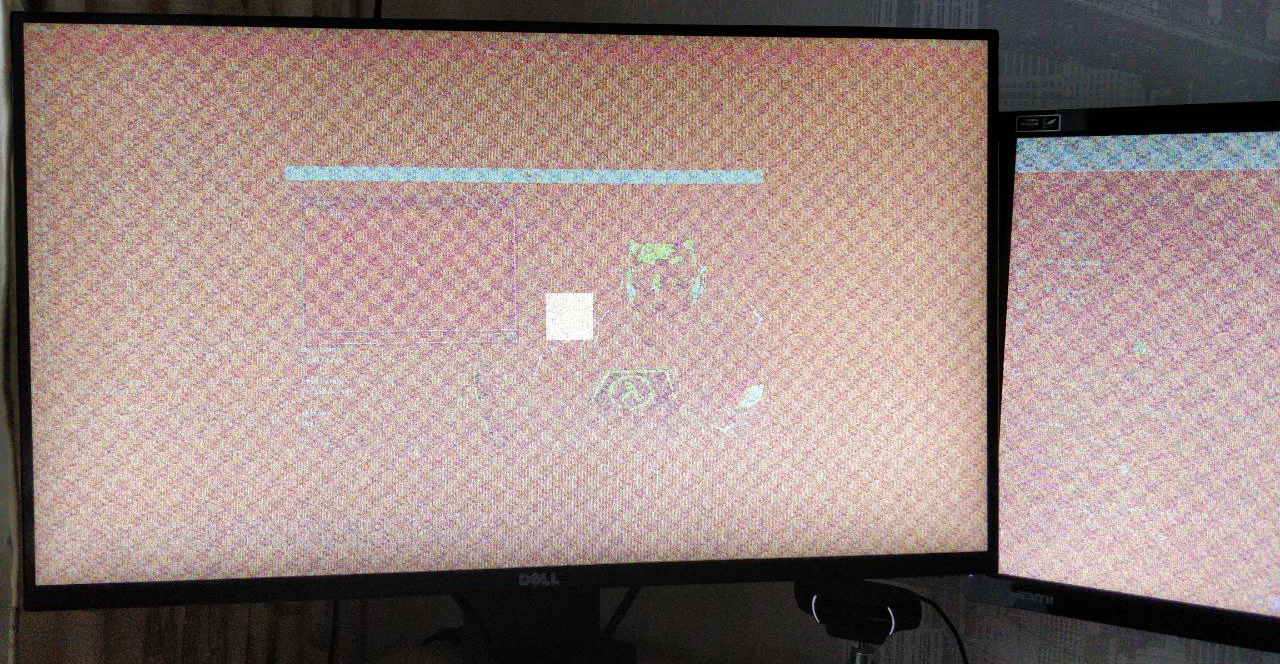
After a few days I ended up temporarily switching to my previous GPU, an NVIDIA GTX 970, and finishing the Vulkan part there. NVIDIA’s proprietary driver proved to be very stable and hasn’t crashed once during my development.
Sharing Memory with OpenGL #
Memory sharing between graphics APIs works by allocating a piece of GPU memory in one API and sending a “pointer” to it to the other API. Specifically, we will create an image in Vulkan and export the underlying memory to OpenGL, where we will bind it to an OpenGL texture. We will also need a shared semaphore to synchronize access to the image between the APIs.
The Vulkan side uses the VK_KHR_external_memory and VK_KHR_external_semaphore extensions to export a memory handle and a semaphore respectively, then the OpenGL side imports them using the EXT_external_objects extension. On Linux exporting is done via file descriptors, and on Windows via handles.
This is how we create an image for sharing with OpenGL:
#[cfg(unix)]
let mut external_memory_image_create_info = vk::ExternalMemoryImageCreateInfo::builder()
    .handle_types(vk::ExternalMemoryHandleTypeFlags::EXTERNAL_MEMORY_HANDLE_TYPE_OPAQUE_FD);
#[cfg(windows)]
let mut external_memory_image_create_info = vk::ExternalMemoryImageCreateInfo::builder()
    .handle_types(vk::ExternalMemoryHandleTypeFlags::EXTERNAL_MEMORY_HANDLE_TYPE_OPAQUE_WIN32);

let create_info = vk::ImageCreateInfo::builder()
    // ...
    .usage(
        vk::ImageUsageFlags::TRANSFER_SRC
            | vk::ImageUsageFlags::TRANSFER_DST
            | vk::ImageUsageFlags::SAMPLED
            | vk::ImageUsageFlags::STORAGE
            | vk::ImageUsageFlags::COLOR_ATTACHMENT
            | vk::ImageUsageFlags::INPUT_ATTACHMENT,
    )
    .push_next(&mut external_memory_image_create_info);

let image_frame = unsafe { device.create_image(&create_info, None)? };
The usage flags include all possible usage types as per a note in EXT_external_objects:
The agreed resolution is to use the final option: Require all supported usage flags be specified by the application on the Vulkan side if the image is intended to alias with an OpenGL texture.
Then we allocate memory for the image:
#[cfg(unix)]
let mut export_memory_allocate_info = vk::ExportMemoryAllocateInfo::builder()
    .handle_types(vk::ExternalMemoryHandleTypeFlags::EXTERNAL_MEMORY_HANDLE_TYPE_OPAQUE_FD);
#[cfg(windows)]
let mut export_memory_allocate_info = vk::ExportMemoryAllocateInfo::builder()
    .handle_types(vk::ExternalMemoryHandleTypeFlags::EXTERNAL_MEMORY_HANDLE_TYPE_OPAQUE_WIN32);

let mut memory_dedicated_allocate_info =
    vk::MemoryDedicatedAllocateInfo::builder().image(image_frame);

let create_info = vk::MemoryAllocateInfo::builder()
    // ...
    .push_next(&mut export_memory_allocate_info)
    .push_next(&mut memory_dedicated_allocate_info);

let image_frame_memory = unsafe { device.allocate_memory(&create_info, None)? };

// Bind our image to the allocated memory.
unsafe { device.bind_image_memory(image_frame, image_frame_memory, 0)? };
Allocating memory for external use requires checking the dedicated memory allocation flag. It can either suggest, or require a dedicated allocation, but it cannot require a non-dedicated allocation. Thus for simplicity I always do a dedicated allocation.
Now let’s export a handle to this memory. I mentioned that ash has partial support for external memory: specifically, it supports Linux file descriptor exporting.
let external_memory_fd = ash::extensions::khr::ExternalMemoryFd::new(instance, &device);

let create_info = vk::MemoryGetFdInfoKHR::builder()
    .memory(image_frame_memory)
    .handle_type(vk::ExternalMemoryHandleTypeFlags::EXTERNAL_MEMORY_HANDLE_TYPE_OPAQUE_FD);
let memory_handle = unsafe { external_memory_fd.get_memory_fd(&create_info)? };
For Windows, we have to use the raw API directly:
let external_memory_win32_fn = vk::KhrExternalMemoryWin32Fn::load(|name| unsafe {
    mem::transmute(instance.get_device_proc_addr(device.handle(), name.as_ptr()))
});

let create_info = vk::MemoryGetWin32HandleInfoKHR::builder()
    .memory(image_frame_memory)
    .handle_type(vk::ExternalMemoryHandleTypeFlags::EXTERNAL_MEMORY_HANDLE_TYPE_OPAQUE_WIN32);

let mut memory_handle = std::ptr::null_mut();
unsafe {
    external_memory_win32_fn.get_memory_win32_handle_khr(
        device.handle(),
        &*create_info,
        &mut memory_handle,
    )
};
Finally, we can import the handle on the OpenGL side:
let mut memory_object = 0;
gl.CreateMemoryObjectsEXT(1, &mut memory_object);

// We're using a dedicated allocation.
gl.MemoryObjectParameterivEXT(memory_object, gl::DEDICATED_MEMORY_OBJECT_EXT, &1);

#[cfg(unix)]
gl.ImportMemoryFdEXT(
    memory_object,
    size,
    gl::HANDLE_TYPE_OPAQUE_FD_EXT,
    memory_handle,
);
#[cfg(windows)]
gl.ImportMemoryWin32HandleEXT(
    memory_object,
    size,
    gl::HANDLE_TYPE_OPAQUE_WIN32_EXT,
    memory_handle,
);

// Create a texture and bind it to the imported memory.
let mut texture = 0;
gl.GenTextures(1, &mut texture);

gl.BindTexture(gl::TEXTURE_2D, texture);
gl.TexStorageMem2DEXT(
    gl::TEXTURE_2D,
    1,
    gl::RGBA8,
    width,
    height,
    memory_object,
    0,
);
Now we have a Vulkan image and an OpenGL texture backed by the same GPU memory. This means that we can write pixels into the OpenGL texture, then read them back from the Vulkan image just fine, as long as we do synchronization correctly.
This is where a semaphore comes into play. The semaphore can be signaled from one API upon completion of a GPU operation (like writing pixels), and waited-for in the other API before starting another GPU operation (like reading pixels back). This way we can guarantee that the reading operation sees the completed result of the writing operation with no data races.
We’ll do a similar exporting-importing dance for the semaphore, created on the Vulkan side:
#[cfg(unix)]
let mut export_semaphore_create_info = vk::ExportSemaphoreCreateInfo::builder().handle_types(
    vk::ExternalSemaphoreHandleTypeFlags::EXTERNAL_SEMAPHORE_HANDLE_TYPE_OPAQUE_FD,
);
#[cfg(windows)]
let mut export_semaphore_create_info = vk::ExportSemaphoreCreateInfo::builder().handle_types(
    vk::ExternalSemaphoreHandleTypeFlags::EXTERNAL_SEMAPHORE_HANDLE_TYPE_OPAQUE_WIN32,
);

let create_info =
    vk::SemaphoreCreateInfo::builder().push_next(&mut export_semaphore_create_info);
let semaphore = unsafe { device.create_semaphore(&create_info, None)? };
In this case ash doesn’t include a wrapper for either Linux or Windows, so we use the raw API for both:
// Linux
let external_semaphore_fd_fn = vk::KhrExternalSemaphoreFdFn::load(|name| unsafe {
    mem::transmute(instance.get_device_proc_addr(device.handle(), name.as_ptr()))
});

let create_info = vk::SemaphoreGetFdInfoKHR::builder()
    .semaphore(semaphore)
    .handle_type(vk::ExternalSemaphoreHandleTypeFlags::EXTERNAL_SEMAPHORE_HANDLE_TYPE_OPAQUE_FD);
let mut semaphore_handle = -1;
unsafe {
    external_semaphore_fd_fn.get_semaphore_fd_khr(
        device.handle(),
        &*create_info,
        &mut semaphore_handle,
    )
};
// Windows
let external_semaphore_win32_fn = vk::KhrExternalSemaphoreWin32Fn::load(|name| unsafe {
    mem::transmute(instance.get_device_proc_addr(device.handle(), name.as_ptr()))
});

let create_info = vk::SemaphoreGetWin32HandleInfoKHR::builder()
    .semaphore(semaphore)
    .handle_type(vk::ExternalSemaphoreHandleTypeFlags::EXTERNAL_SEMAPHORE_HANDLE_TYPE_OPAQUE_WIN32);
let mut semaphore_handle = std::ptr::null_mut();
unsafe {
    external_semaphore_win32_fn.get_semaphore_win32_handle_khr(
        device.handle(),
        &*create_info,
        &mut semaphore_handle,
    )
};
Importing from the OpenGL side is simple:
let mut semaphore = 0;
gl.GenSemaphoresEXT(1, &mut semaphore);

#[cfg(unix)]
gl.ImportSemaphoreFdEXT(semaphore, gl::HANDLE_TYPE_OPAQUE_FD_EXT, semaphore_handle);
#[cfg(windows)]
gl.ImportSemaphoreWin32HandleEXT(
    semaphore,
    gl::HANDLE_TYPE_OPAQUE_WIN32_EXT,
    semaphore_handle,
);
Capturing a Frame #
Here’s a simplified diagram of the Half-Life’s game loop operation:
We’ll capture the pixel contents of a frame by running some code just before the game swaps buffers to show it on the screen:
We need to synchronize access to the shared memory between OpenGL and Vulkan. The memory will be written by OpenGL, then read by Vulkan, then written by OpenGL again next frame, then read by Vulkan again, and so on in a loop. On each of these steps the corresponding API will “acquire” the memory by waiting for the semaphore, do the operation, then “release” the memory by signaling the semaphore again.
On the OpenGL side I blit (copy) the current framebuffer (which contains the frame Half-Life is about to show on screen) to the OpenGL texture bound to the shared memory via an auxiliary framebuffer. I am also careful to restore the previously-bound framebuffer so the game continues working properly.
// Acquire shared memory ownership from Vulkan.
gl.WaitSemaphoreEXT(
    semaphore,
    0,
    null(),
    1,
    [texture].as_ptr(),
    // We keep the image in the general layout between using it.
    [gl::LAYOUT_GENERAL_EXT].as_ptr(),
);

// Save previously-bound framebuffer.
let mut previous_framebuffer = 0;
gl.GetIntegerv(gl::DRAW_FRAMEBUFFER_BINDING, &mut previous_framebuffer);

// Bind a destination framebuffer targeting our texture.
gl.BindFramebuffer(gl::DRAW_FRAMEBUFFER, framebuffer);
gl.FramebufferTexture2D(
    gl::DRAW_FRAMEBUFFER,
    gl::COLOR_ATTACHMENT0,
    gl::TEXTURE_2D,
    texture,
    0,
);

// Copy pixel contents from the game's framebuffer to ours.
gl.BlitFramebuffer(
    0,
    0,
    width,
    height,
    0,
    0,
    width,
    height,
    gl::COLOR_BUFFER_BIT,
    gl::NEAREST,
);

// Restore the framebuffer that the game had bound as the destination.
gl.BindFramebuffer(gl::DRAW_FRAMEBUFFER, previous_framebuffer as u32);

// Transfer shared memory ownership to Vulkan.
gl.SignalSemaphoreEXT(
    semaphore,
    0,
    null(),
    1,
    [texture].as_ptr(),
    // Transfer it back to the general layout.
    [gl::LAYOUT_GENERAL_EXT].as_ptr(),
);

// Submit the commands to the GPU.
gl.Flush();
On the Vulkan side, acquisition and release with another graphics API (OpenGL) require barriers:
let begin_info =
    vk::CommandBufferBeginInfo::builder().flags(vk::CommandBufferUsageFlags::ONE_TIME_SUBMIT);
device.begin_command_buffer(command_buffer_sampling, &begin_info)?;

// Acquire the image from OpenGL.
let image_frame_memory_barrier = vk::ImageMemoryBarrier::builder()
    .src_access_mask(vk::AccessFlags::empty())
    .dst_access_mask(vk::AccessFlags::empty())
    // We keep the image in the general layout between using it.
    .old_layout(vk::ImageLayout::GENERAL)
    .new_layout(vk::ImageLayout::TRANSFER_SRC_OPTIMAL)
    // QUEUE_FAMILY_EXTERNAL indicates a different graphics API.
    .src_queue_family_index(vk::QUEUE_FAMILY_EXTERNAL)
    .dst_queue_family_index(queue_family_index)
    .image(image_frame)
    .subresource_range(vk::ImageSubresourceRange {
        aspect_mask: vk::ImageAspectFlags::COLOR,
        base_mip_level: 0,
        level_count: 1,
        base_array_layer: 0,
        layer_count: 1,
    });

device.cmd_pipeline_barrier(
    command_buffer_sampling,
    vk::PipelineStageFlags::TOP_OF_PIPE,
    vk::PipelineStageFlags::TRANSFER,
    vk::DependencyFlags::empty(),
    &[],
    &[],
    &[*image_frame_memory_barrier],
);

// (additional commands to blit the image to another intermediate buffer)

// Transfer image_frame back to OpenGL.
let image_frame_memory_barrier = vk::ImageMemoryBarrier::builder()
    .src_access_mask(vk::AccessFlags::empty())
    .dst_access_mask(vk::AccessFlags::empty())
    // We can erase the image_frame contents now, we already read them.
    .old_layout(vk::ImageLayout::UNDEFINED)
    // Transfer the layout back to general.
    .new_layout(vk::ImageLayout::GENERAL)
    .src_queue_family_index(queue_family_index)
    .dst_queue_family_index(vk::QUEUE_FAMILY_EXTERNAL)
    .image(image_frame)
    .subresource_range(vk::ImageSubresourceRange {
        aspect_mask: vk::ImageAspectFlags::COLOR,
        base_mip_level: 0,
        level_count: 1,
        base_array_layer: 0,
        layer_count: 1,
    });

device.cmd_pipeline_barrier(
    command_buffer_sampling,
    vk::PipelineStageFlags::TRANSFER,
    vk::PipelineStageFlags::BOTTOM_OF_PIPE,
    vk::DependencyFlags::empty(),
    &[],
    &[],
    &[*image_frame_memory_barrier],
);

device.end_command_buffer(command_buffer_sampling)?;

let semaphores = [semaphore];
let command_buffers = [command_buffer_sampling];
let submit_info = vk::SubmitInfo::builder()
    // Wait for our semaphore before starting.
    .wait_semaphores(&semaphores)
    .wait_dst_stage_mask(&[vk::PipelineStageFlags::ALL_COMMANDS])
    // Signal the semaphore after completion.
    .signal_semaphores(&semaphores)
    .command_buffers(&command_buffers);
device.queue_submit(queue, &[*submit_info], vk::Fence::null())?;
Here’s how the process looks now:
As you can see, I’m actually using another intermediate image rather than running the compute shader on image_frame directly. This is to handle the case when the game’s rendering framerate doesn’t match the video output framerate. There are two common scenarios which cause this to happen:
- We’re doing motion blur via frame blending. The game runs at a higher FPS, e.g. output video FPS times 64, and each 64 captured frames are blended together to produce one output video frame. In this case every frame we’d accumulate pixel values of
image_frameinto the intermediate buffer, and only run color conversion once per the output video frame. - We’re recording a video of a tool-assisted speedrun (TAS). This is a script describing keyboard and mouse inputs to the game which can be played back deterministically, similarly to a demo file. There’s one important difference: a TAS script must set its own in-game FPS, so video recording (which wants constant output video FPS) needs to deal with it by duplicating or dropping output video frames, very much like regular screen recording software deals with varying FPS of a game it’s recording. In this case we don’t actually know for how long
image_frameshould be shown in the video until Half-Life renders the next frame, which means that we can only start the next processing stage right when we already need to capture the next frame. To add a bit of pipelining in this case, we saveimage_frameinto the intermediate buffer right away, freeing the shared memory for the next capture, then process the intermediate buffer later when we know the duration.
Color Conversion #
I chose to output MP4 videos encoded in H.264 with YUV 4:2:0 pixel format and limited-range BT.709 color space. H.264 in an MP4 container with YUV 4:2:0 pixel format is playable on the most setups out of the currently available reasonable formats, while limited-range BT.709 should generally be selected as the color space by video players (for video resolutions that people will likely record), resulting in correct colors even if the video player ignores explicit color space tags.
Color space conversion is best done on the GPU as it’s a massively parallel operation (each pixel is essentially processed separately from the others), which GPUs are really good at. Thus, I implemented it with a compute shader:
#version 450
#extension GL_EXT_shader_8bit_storage: require

// I selected the value that gave the best performance on this workflow.
#define WORKGROUP_SIZE 4
layout (local_size_x = WORKGROUP_SIZE, local_size_y = WORKGROUP_SIZE, local_size_z = 1) in;

// Our intermediate buffer with the RGB image.
layout (binding = 0) uniform sampler2D image_sample;

// The output buffer in I420 format, ready to go into FFmpeg.
layout (binding = 1) buffer OutputBuffer {
    uint8_t output_buffer[];
};

void main() {
    vec2 size = textureSize(image_sample, 0);
    uint width = uint(size.x), height = uint(size.y);

    uint x = gl_GlobalInvocationID.x, y = gl_GlobalInvocationID.y;
    if (x >= width || y >= height)
        return;

    vec4 color = texture(image_sample, vec2(x + 0.5, y + 0.5));

    // The OpenGL coordinate system is upside-down compared to the usual video coordinate systems.
    // Let's invert it here in the shader.
    uint y_inv = height - y - 1;

    // Compute luminocity in accordance with the BT.709 specification.
    float Y = 16 + dot(color.rgb, vec3(0.2126, 0.7152, 0.0722) * (235 - 16));
    output_buffer[width * y_inv + x] = uint8_t(uint(round(Y)));

    // 4:2:0 subsampling means we compute one output color pixel
    // per each 2×2 square of input color pixels.
    if (x % 2 == 0 && y % 2 == 0) {
        // Subsample the color values assuming center chroma location.
        vec4 b = texture(image_sample, vec2(x + 1 + 0.5, y     + 0.5));
        vec4 c = texture(image_sample, vec2(x     + 0.5, y + 1 + 0.5));
        vec4 d = texture(image_sample, vec2(x + 1 + 0.5, y + 1 + 0.5));
        color = (color + b + c + d) / 4;

        // Convert color values in accordance with the BT.709 specification.
        float U = 128 + dot(color.rgb, vec3(-0.2126, -0.7152,  0.9278) / 1.8556 * (240 - 16));
        float V = 128 + dot(color.rgb, vec3( 0.7874, -0.7152, -0.0722) / 1.5748 * (240 - 16));

        // Write the values into the output buffer in the I420 format (planar YUV 4:2:0).
        output_buffer[width * height         + (width / 2) * (y_inv / 2) + (x / 2)] =
            uint8_t(uint(round(U)));
        output_buffer[width * height / 4 * 5 + (width / 2) * (y_inv / 2) + (x / 2)] =
            uint8_t(uint(round(V)));
    }
}
I’m using the VK_KHR_8bit_storage extension to write directly into a byte buffer from a shader. Without the extension I would have to make a regular image and then carefully write to the right pixel color values in the shader in such a way that, when interpreted as bytes, I’d get the correct I420 frame, but this would be very awkward. VK_KHR_8bit_storage is reasonably well supported so there are little compatibility concerns.
I get color values from the input frame, convert them to YUV with numeric constants from the specification and write the results out into the byte buffer in I420 order.
Let’s see how the input image and the output buffer are created.
// Intermediate image, input to the color conversion shader.
let create_info = vk::ImageCreateInfo {
    image_type: vk::ImageType::TYPE_2D,
    // Format suitable for frame blending, if I implement it in the future.
    format: vk::Format::R16G16B16A16_UNORM,
    extent: vk::Extent3D {
        width,
        height,
        depth: 1,
    },
    mip_levels: 1,
    array_layers: 1,
    samples: vk::SampleCountFlags::TYPE_1,
    tiling: vk::ImageTiling::OPTIMAL,
    usage: vk::ImageUsageFlags::STORAGE // For updating in-place during frame blending.
        | vk::ImageUsageFlags::TRANSFER_DST // For copying from image_frame.
        | vk::ImageUsageFlags::SAMPLED, // For reading from the color conversion shader.
    sharing_mode: vk::SharingMode::EXCLUSIVE,
    ..Default::default()
};
let image_sample = unsafe { device.create_image(&create_info, None)? };

// Allocate memory for the image.
let image_sample_memory_requirements =
    unsafe { device.get_image_memory_requirements(image_sample) };
let image_sample_memory_type_index = find_memorytype_index(
    &image_sample_memory_requirements,
    &memory_properties,
    vk::MemoryPropertyFlags::DEVICE_LOCAL,
)?;
let create_info = vk::MemoryAllocateInfo::builder()
    .allocation_size(image_sample_memory_requirements.size)
    .memory_type_index(image_sample_memory_type_index);
let image_sample_memory = unsafe { device.allocate_memory(&create_info, None)? };

// Bind them together.
unsafe { device.bind_image_memory(image_sample, image_sample_memory, 0)? };
To read from an image in a shader, we also need a sampler (which controls coordinate normalization and reading past the edge behavior) and an image view:
// Sampler.
let create_info = vk::SamplerCreateInfo::builder()
    // Reads past the edge return the edge pixel value.
    .address_mode_u(vk::SamplerAddressMode::CLAMP_TO_EDGE)
    .address_mode_v(vk::SamplerAddressMode::CLAMP_TO_EDGE)
    .address_mode_w(vk::SamplerAddressMode::CLAMP_TO_EDGE)
    // We'll use coordinates from 0 to width/height, rather than from 0 to 1.
    .unnormalized_coordinates(true);
let sampler_sample = unsafe { device.create_sampler(&create_info, None)? };

// Image view.
let create_info = vk::ImageViewCreateInfo::builder()
    .image(image_sample)
    .view_type(vk::ImageViewType::TYPE_2D)
    .format(vk::Format::R16G16B16A16_UNORM)
    .subresource_range(vk::ImageSubresourceRange {
        aspect_mask: vk::ImageAspectFlags::COLOR,
        base_mip_level: 0,
        level_count: 1,
        base_array_layer: 0,
        layer_count: 1,
    });
let image_view_sample = unsafe { device.create_image_view(&create_info, None)? };
Now for the output buffer. Actually, we’ll need two buffers: one device-local buffer which the shader will write to directly, and one “staging” CPU-accessible buffer that we’ll copy the results to for reading into RAM.
This might seem strange: why use two buffers instead of one? As it turns out, CPU-accessible buffers can be really slow to use for shader output, making the two-buffer scheme orders of magnitude faster.
// Buffer for color conversion shader output.
let create_info = vk::BufferCreateInfo::builder()
    // 4:2:0 subsampling: full-resolution Y + quarter-resolution U, V.
    .size(width as u64 * height as u64 / 2 * 3)
    .usage(
        // For using as the shader output.
        vk::BufferUsageFlags::STORAGE_BUFFER
        // For using as a source of a copy operation into the CPU-accessible buffer.
        | vk::BufferUsageFlags::TRANSFER_SRC
    )
    .sharing_mode(vk::SharingMode::EXCLUSIVE);
let buffer_color_conversion_output = unsafe { device.create_buffer(&create_info, None)? };

let buffer_color_conversion_output_memory_requirements =
    unsafe { device.get_buffer_memory_requirements(buffer_color_conversion_output) };
let buffer_color_conversion_output_memory_type_index = find_memorytype_index(
    &buffer_color_conversion_output_memory_requirements,
    &memory_properties,
    // This buffer resides on the GPU.
    vk::MemoryPropertyFlags::DEVICE_LOCAL,
)?;
let create_info = vk::MemoryAllocateInfo::builder()
    .allocation_size(buffer_color_conversion_output_memory_requirements.size)
    .memory_type_index(buffer_color_conversion_output_memory_type_index);
let buffer_color_conversion_output_memory =
    unsafe { device.allocate_memory(&create_info, None)? };
unsafe {
    device.bind_buffer_memory(
        buffer_color_conversion_output,
        buffer_color_conversion_output_memory,
        0,
    )?
};

// CPU-accessible staging buffer.
let create_info = vk::BufferCreateInfo::builder()
    // Same size as the buffer above.
    .size(width as u64 * height as u64 / 2 * 3)
    // For using it as a destination of a copy operation.
    .usage(vk::BufferUsageFlags::TRANSFER_DST)
    .sharing_mode(vk::SharingMode::EXCLUSIVE);
let buffer = unsafe { device.create_buffer(&create_info, None)? };

let buffer_memory_requirements = unsafe { device.get_buffer_memory_requirements(buffer) };
let buffer_memory_type_index = find_memorytype_index(
    &buffer_memory_requirements,
    &memory_properties,
    // This buffer is CPU-accessible.
    vk::MemoryPropertyFlags::HOST_VISIBLE | vk::MemoryPropertyFlags::HOST_CACHED,
)?;
let create_info = vk::MemoryAllocateInfo::builder()
    .allocation_size(buffer_memory_requirements.size)
    .memory_type_index(buffer_memory_type_index);
let buffer_memory = unsafe { device.allocate_memory(&create_info, None)? };
unsafe { device.bind_buffer_memory(buffer, buffer_memory, 0)? };
To use all these objects in the shader we also need a descriptor set allocated from a descriptor pool with a descriptor set layout and filled with our sampler and buffer, as well as the shader itself, and a pipeline encompassing all of those objects, however all of that is fairly standard with nothing interesting to point out.
Let’s look at how the pipeline is launched.
let begin_info = vk::CommandBufferBeginInfo::builder()
    .flags(vk::CommandBufferUsageFlags::ONE_TIME_SUBMIT);
device.begin_command_buffer(command_buffer_color_conversion, &begin_info)?;

// Set a barrier for the color conversion stage.
let image_sample_memory_barrier = vk::ImageMemoryBarrier::builder()
    // We were copying from image_frame to this intermediate image.
    .src_access_mask(vk::AccessFlags::TRANSFER_WRITE)
    // We will be reading from this image in a shader.
    .dst_access_mask(vk::AccessFlags::SHADER_READ)
    // The layouts reflect this too.
    .old_layout(vk::ImageLayout::TRANSFER_DST_OPTIMAL)
    .new_layout(vk::ImageLayout::SHADER_READ_ONLY_OPTIMAL)
    .src_queue_family_index(vk::QUEUE_FAMILY_IGNORED)
    .dst_queue_family_index(vk::QUEUE_FAMILY_IGNORED)
    .image(image_sample)
    .subresource_range(vk::ImageSubresourceRange {
        aspect_mask: vk::ImageAspectFlags::COLOR,
        base_mip_level: 0,
        level_count: 1,
        base_array_layer: 0,
        layer_count: 1,
    });

device.cmd_pipeline_barrier(
    command_buffer_color_conversion,
    vk::PipelineStageFlags::TRANSFER,
    vk::PipelineStageFlags::COMPUTE_SHADER,
    vk::DependencyFlags::empty(),
    &[],
    &[],
    &[*image_sample_memory_barrier],
);

// To run the color conversion shader, we need to bind its pipeline and descriptor sets.
device.cmd_bind_pipeline(
    command_buffer_color_conversion,
    vk::PipelineBindPoint::COMPUTE,
    pipeline,
);
device.cmd_bind_descriptor_sets(
    command_buffer_color_conversion,
    vk::PipelineBindPoint::COMPUTE,
    pipeline_layout,
    0,
    &[descriptor_set_color_conversion],
    &[],
);

// Run the shader.
device.cmd_dispatch(
    command_buffer_color_conversion,
    // Our workgroup size is 4, this subdivision reflects that.
    (width + 4 - 1) / 4,
    (height + 4 - 1) / 4,
    1,
);

// Barrier for the device-local buffer to copy it to the CPU-accessible buffer.
let buffer_memory_barrier = vk::BufferMemoryBarrier::builder()
    // We were writing to the device-local buffer in a shader.
    .src_access_mask(vk::AccessFlags::SHADER_WRITE)
    // We will be reading from it with a copy operation.
    .dst_access_mask(vk::AccessFlags::TRANSFER_READ)
    .src_queue_family_index(vk::QUEUE_FAMILY_IGNORED)
    .dst_queue_family_index(vk::QUEUE_FAMILY_IGNORED)
    .buffer(buffer_color_conversion_output)
    .offset(0)
    .size(vk::WHOLE_SIZE);

device.cmd_pipeline_barrier(
    command_buffer_color_conversion,
    vk::PipelineStageFlags::COMPUTE_SHADER,
    vk::PipelineStageFlags::TRANSFER,
    vk::DependencyFlags::empty(),
    &[],
    &[*buffer_memory_barrier],
    &[],
);

// The copy command itself.
let buffer_copy = vk::BufferCopy::builder().size(width as u64 * height as u64 / 2 * 3);
device.cmd_copy_buffer(
    command_buffer_color_conversion,
    buffer_color_conversion_output,
    buffer,
    &[*buffer_copy],
);

// Barrier for the CPU-accessible buffer to read it from the host.
let buffer_memory_barrier = vk::BufferMemoryBarrier::builder()
    // We were copying into the buffer.
    .src_access_mask(vk::AccessFlags::TRANSFER_WRITE)
    // We will be reading it from the host.
    .dst_access_mask(vk::AccessFlags::HOST_READ)
    .src_queue_family_index(vk::QUEUE_FAMILY_IGNORED)
    .dst_queue_family_index(vk::QUEUE_FAMILY_IGNORED)
    .buffer(buffer)
    .offset(0)
    .size(vk::WHOLE_SIZE);

device.cmd_pipeline_barrier(
    command_buffer_color_conversion,
    vk::PipelineStageFlags::TRANSFER,
    vk::PipelineStageFlags::HOST,
    vk::DependencyFlags::empty(),
    &[],
    &[*buffer_memory_barrier],
    &[],
);

// While we're at it, also prepare the intermediate image for another iteration
// by transferring it back to the original TRANSFER_DST layout.
let image_sample_memory_barrier = vk::ImageMemoryBarrier::builder()
    .src_access_mask(vk::AccessFlags::empty())
    .dst_access_mask(vk::AccessFlags::TRANSFER_WRITE)
    // We don't care about the contents any more.
    .old_layout(vk::ImageLayout::UNDEFINED)
    .new_layout(vk::ImageLayout::TRANSFER_DST_OPTIMAL)
    .src_queue_family_index(vk::QUEUE_FAMILY_IGNORED)
    .dst_queue_family_index(vk::QUEUE_FAMILY_IGNORED)
    .image(image_sample)
    .subresource_range(vk::ImageSubresourceRange {
        aspect_mask: vk::ImageAspectFlags::COLOR,
        base_mip_level: 0,
        level_count: 1,
        base_array_layer: 0,
        layer_count: 1,
    });
device.cmd_pipeline_barrier(
    command_buffer_color_conversion,
    vk::PipelineStageFlags::COMPUTE_SHADER,
    vk::PipelineStageFlags::TRANSFER,
    vk::DependencyFlags::empty(),
    &[],
    &[],
    &[*image_sample_memory_barrier],
);

device.end_command_buffer(command_buffer_color_conversion)?;
With the command buffer set up, we’re almost ready to send it to the GPU. However, this time we want to read the pixel values back on the CPU to send them to the video encoder, which means that we need to wait for the GPU to complete these operations. This is where a Vulkan fence comes into play: the GPU can signal a fence upon finishing a command buffer, and the CPU can wait for the fence. After that we’re free to map the CPU-accessible buffer and read from it as normal.
// To wait for GPU operation completion on the host, we need a fence.
let create_info = vk::FenceCreateInfo::default();
let fence = device.create_fence(&create_info, None)?;

let command_buffers = [command_buffer_color_conversion];
let submit_info = vk::SubmitInfo::builder().command_buffers(&command_buffers);
device.queue_submit(
    queue,
    &[*submit_info],
    // The fence will be signaled upon completion of the command buffer.
    fence,
)?;

// Wait for the fence to be signalled.
device.wait_for_fences(&[fence], true, u64::max_value())?;

// Map the CPU-accessible buffer to read from it normally.
let pixels = device.map_memory(
    buffer_memory,
    0,
    vk::WHOLE_SIZE,
    vk::MemoryMapFlags::empty(),
)?;

// Invalidate it to make sure we're reading up-to-date data.
let mapped_memory_range = vk::MappedMemoryRange::builder()
    .memory(buffer_memory)
    .size(vk::WHOLE_SIZE);
device.invalidate_mapped_memory_ranges(&[*mapped_memory_range])?;

{
    // Now we can treat it as a regular array of pixels.
    let pixels: &[u8] =
        slice::from_raw_parts(pixels.cast(), width as usize * height as usize / 2 * 3);

    // Send it to the encoder, possibly multiple times (for the TAS playback case).
    for _ in 0..frames {
        muxer.write_video_frame(pixels)?;
    }
}

// Unmap the memory and free the fence.
device.unmap_memory(buffer_memory);
device.destroy_fence(fence, None);
All in all, this is the simplified diagram of the complete video recording process:
Staging Buffer Memory Type #
For the staging buffer I went with the HOST_VISIBLE | HOST_CACHED memory type. HOST_VISIBLE is required to access it from the CPU, while HOST_CACHED brought a big performance boost. HOST_COHERENT, the third available flag, did not seem to bring any benefit.
Let’s look at a performance visualization of several ways of reading memory from the GPU. The measurements were done recording at the 2560×1440 resolution and 60 FPS.
First, no staging buffer. The shader writes directly to a CPU-accessible buffer:

The green rectangle is waiting for the Vulkan fence, while the rest (not filled on this particular trace) is reading from the buffer and writing it to the pipe. The whole process takes 107 ms which is… quite underwhelming. This adds up to about 0.16× real-time speed of capturing.
Next, I’ll add a staging buffer, but without the HOST_CACHED flag. I didn’t have the next performance traces left from the time when I did the initial measurements, so I captured new ones on the latest version, where color conversion and muxing live on the second thread, but otherwise nothing changed in this function.
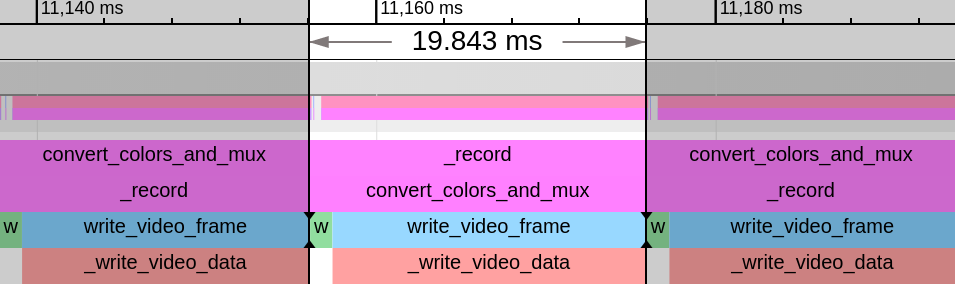
20 ms, much better! The process got more than five times faster. Note how the time waiting for the fence (so GPU work duration) went down too: the GPU can write to a device-local buffer much faster.
Finally, let’s add HOST_CACHED:
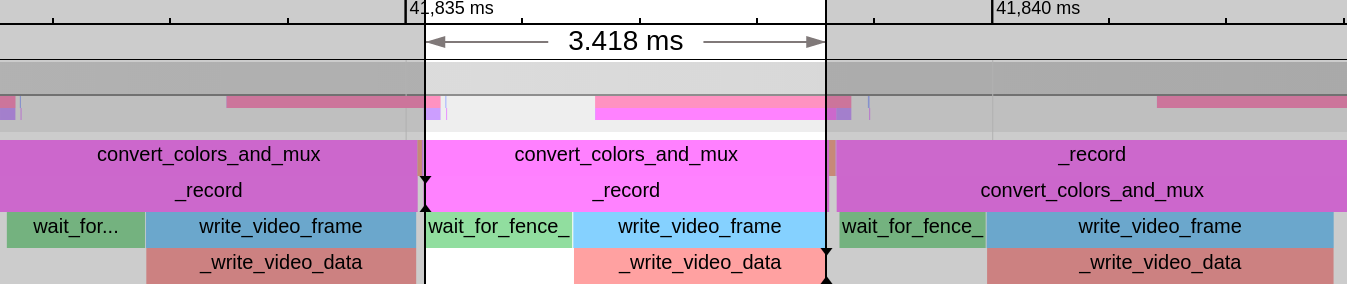
Just 3.4 ms, almost six times faster than before, wow! This time the improvement comes mainly from reading the buffer on the CPU side with no change to the GPU work duration. And we’re definitely exceeding the real-time encoding threshold here, by a factor of more than four.
The key takeaways are to use an extra staging buffer instead of writing from a shader directly to a CPU-accessible buffer and use HOST_CACHED for much faster memory reading.
Video Encoding #
For video encoding I use FFmpeg by running the ffmpeg binary and sending it content through a pipe. A more natural solution might seem to use the FFmpeg API as a library (in fact, I did just that in hl-capture), however this option has some drawbacks:
- When using FFmpeg as a library, video encoding happens in-process. Since Half-Life is a 32-bit application, this means the RAM is heavily limited. In practice, 4K recording in hl-capture already starts hitting out of memory situations, and higher resolutions are straight up impossible. One of the goals for the new video recording was to lift this restriction.
- The FFmpeg API has an over a decade long history, which really shows. It’s full of different ways of doing the same thing, each filled with gotchas and compatibility traps. The best way of working with FFmpeg seems to be to delegate all this trouble to the official binaries, which have at least some hope of working properly in most situations.
- The Rust FFmpeg wrapper have not seen updates since 2015, although it seems that recently a few new crates have appeared to fill that gap; I haven’t looked at them thoroughly though.
Thus, I spawn ffmpeg with the correct arguments (notably, specifying the color space parameters) and pipe video and audio data to it, manually muxed into the NUT container format. The ffmpeg command line I’m using looks like this:
ffmpeg -f nut             # Input format.
       -i pipe:           # Data comes on the standard input.
       -c:v libx264       # Use libx264 for H.264 encoding.
       -crf 15            # For all intents and purposes, CRF 15 is visually lossless.
       -preset ultrafast  # Speed is a priority to avoid bottlenecks on encoding.

       # We're using BT.709…
       -color_primaries bt709
       -color_trc bt709
       -colorspace bt709
       # …with limited color range…
       -color_range tv
       # …and center chroma location.
       -chroma_sample_location center

       # Move the MP4 index to the start of the file for fast playback start when streaming.
       -movflags +faststart
       # Overwrite the file if it exists.
       -y
       output_filename.mp4
Conclusion #
The new Half-Life video recording works well on Linux and Windows and across a wide range of GPUs. Thanks to running FFmpeg out of process, it’s easy to record at very high resolutions such as 8K and possibly even 16K, all while running extremely fast thanks to GPU color conversion and a pipelined architecture.
To sum up, here are the main factors contributing to the performance:
- Running most of the processing on a second thread so it runs parallel to the game working on the next frame.
- Converting the color space from RGB to YUV on the GPU which is extremely well suited for this sort of task.
- Using a
HOST_CACHEDstaging buffer for best performance of getting data from the GPU to the CPU. - Encoding with
libx264using theultrafastpreset to avoid encoding bottlenecks.
A very interesting potential improvement is to do encoding on the GPU. libx264, even if very fast, is still a software encoder; besides, transferring compressed bitstream from the GPU should be faster than transferring full uncompressed YUV 4:2:0 frames. I’m looking forward to the Vulkan video extensions proposal which exposes GPU decoding and encoding through the Vulkan API, which I’m conveniently already using.
Even if the current encoding speed is “fast enough”, GPU encoding might allow using newer video compression formats by bringing the encoding performance on par with libx264.
Finally, if you’re doing any sort of Vulkan development, I heavily recommend using the validation layers as they automatically catch many mistakes and subtle errors in Vulkan usage.
Average day writing Vulkan on AMD
-
I did most of the development and optimization on my machine with an Intel i7-3770k CPU (overclocked to 4.2 GHz) and an AMD RX 580 GPU. ↩︎