Hello! I’m Ivan Molodetskikh, a computer science student from Moscow, Russia.
I’ve been involved in GNOME starting from my GSoC 2018 project to port librsvg filters to Rust. Throughout the last year in GNOME I’ve been doing some work to reduce input latency in Mutter, the GNOME’s compositor (by implementing the presentation-time Wayland protocol and adding dynamic render time computation). I’ve also created two small apps, Video Trimmer and Identity.
As part of this year’s Google Summer of Code, I’m implementing a new screenshot UI in GNOME Shell.
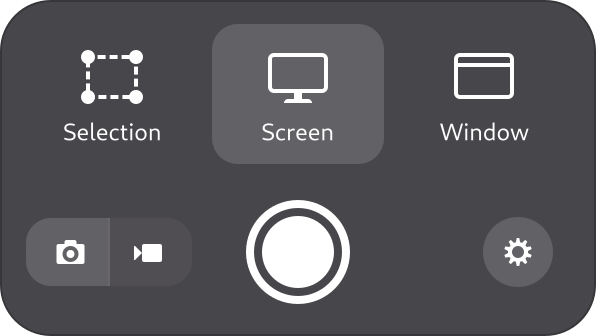
Screenshot UI panel mock-up by the design team
The UI will make taking screenshots and recording screencasts more intuitive and discoverable. On a key press, GNOME Shell will capture a full screenshot, and you will be able to select the exact area you want. The screenshot is captured immediately, so it’s much easier to catch the right moment or capture open context menus.
Screencasts will get an upgrade too: you will be able to record areas of the screen or individual windows, just like you already can with screenshots.
Over the first few weeks I figured out how to add new UI elements to GNOME Shell: how to construct UI with GJS, how to style elements with CSS, the difference between Clutter actors and layouts and St (GNOME Shell’s toolkit) widgets, how to do transitions and handle input. I’ve been basing my work on the UI mock-up from the design team. Here’s a short demo of what I’ve implemented so far:
Demo of the parts of the mock-up that I’ve implemented thus far
Keep in mind this is very much a work-in-progress: I used stock icons instead of correct mock-up ones, I haven’t got any designer feedback yet, screen recording is not implemented and so on.
Using Robert Mader’s texture actor implementation, I added a Mutter function to snapshot the screen contents into a GPU texture that can be shown on a GNOME Shell widget. This way I can instantly display the screenshot preview in the UI without doing a slow PNG encoding round-trip. Then the UI allows you to select an area or a screen and record it into an image by pressing the capture button. Currently, the image is copied into the clipboard. I paste the screenshot into Obfuscate to display it.
When switching into the screencast mode, instead of the screen snapshot you can simply see your desktop normally because screen recording starts only upon pressing the capture button, not from an old screen snapshot.
The next step is to implement Window selection, which will arrange windows similarly to the Overview. Afterwards I’ll work on the screen recording part. I have also contacted the design team to get feedback and make sure the UI is the best it can be.
I’d like to thank my mentor, Jonas Dreßler (aka verdre), for keeping up with my questions. I’m excited to bring an awesome screenshot UI to GNOME, see you all in the next blog posts!