Over the summer I’m working on a new screenshot UI for GNOME Shell. Here’s my progress since the last post.
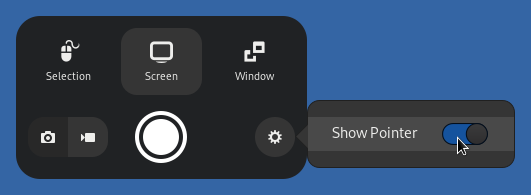
The new “Show Pointer” toggle in the screenshot UI
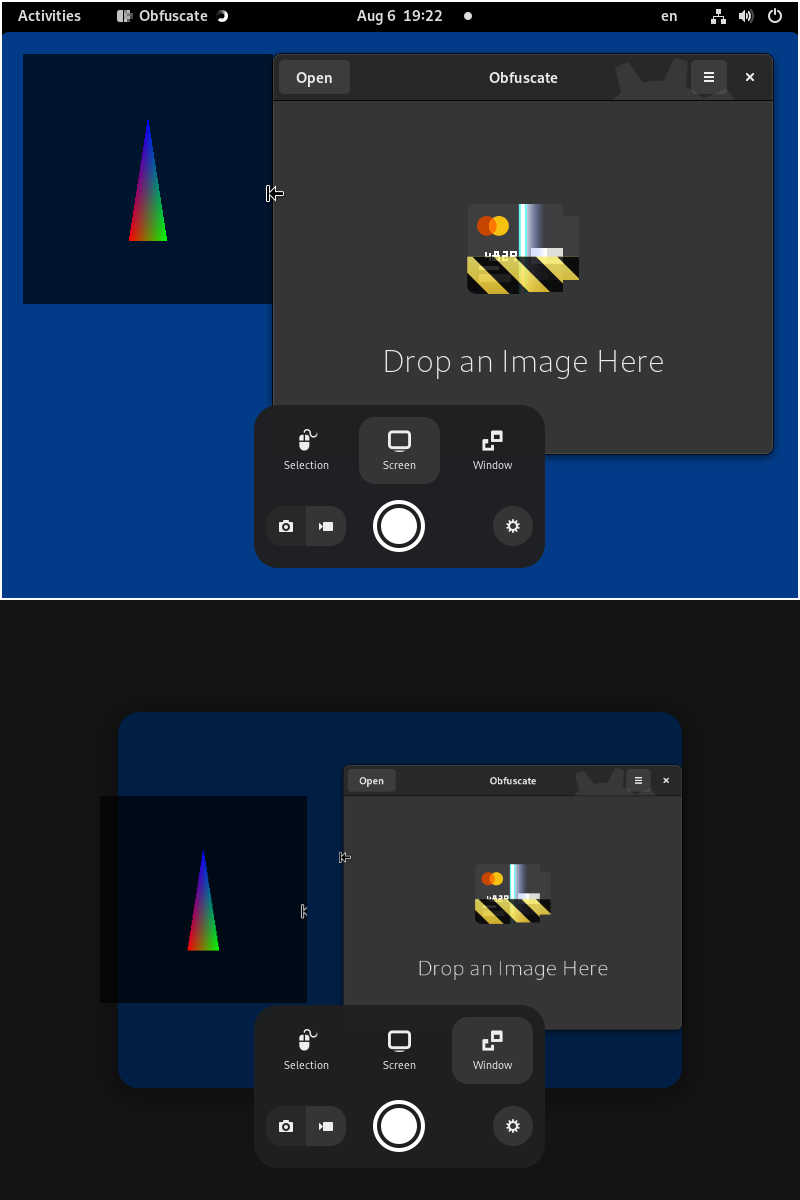
First of all, I made the window selection mode work across multiple screens and ensured that it works correctly with HiDPI and mixed DPI setups. Each screen gets its own Overview-like view of all the windows, letting you pick the one you need at your leisure.
In this and the following showcases, you can see GNOME Shell running with two virtual monitors: one regular DPI on the left, and one high DPI (200% scaling) on the right. Both virtual monitors use the same resolution, which is why the right one appears two times smaller.
Window selection working across two monitors
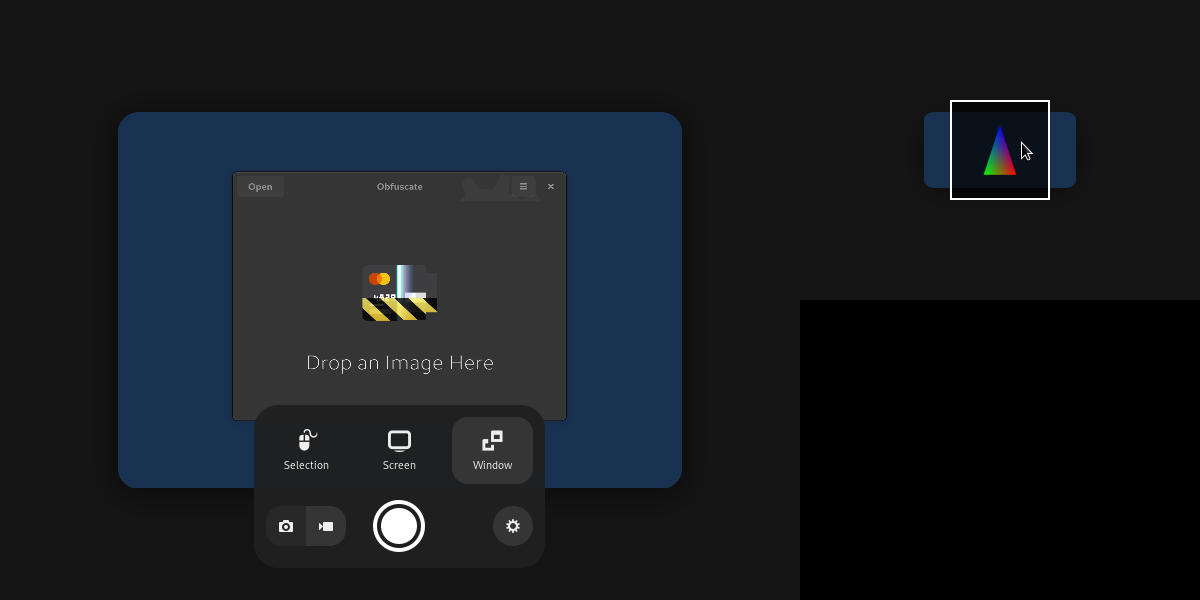
Next, I implemented the screen selection mode which lets you choose a full monitor to screenshot.
Screen selection with the primary monitor selected
Finally, I embarked on an adventure to add a “Show Pointer” toggle. Following the spirit of the screenshot UI, you should be able to hit your Print Screen key first and adjust the screenshot contents afterwards. That is, you should be able to show and hide the mouse pointer and see it on the preview in real-time.
But first things first: let’s figure out how to add a menu. There’s a handy PopupMenu class that you can inherit to make your own menu:
class UIMenu extends PopupMenu.PopupMenu {
    constructor(sourceActor) {
        // The third argument controls which side
        // the menu "points" to. Here the menu
        // will point to the left.
        super(sourceActor, 0, St.Side.LEFT);

        Main.uiGroup.add_actor(this.actor);
        this.actor.hide();
    }

    toggle() {
        if (this.isOpen)
            this.close(BoxPointer.PopupAnimation.FULL);
        else
            this.open(BoxPointer.PopupAnimation.FULL);
    }
}
To show the menu on a button press, we also need a PopupMenuManager:
let button = new St.Button();

let menu = new UIMenu(button);
let manager = new PopupMenu.PopupMenuManager(button);
manager.addMenu(menu);

button.connect('clicked', () => menu.toggle());
Let’s add a switch to our menu. PopupSwitchMenuItem is exactly what we need:
class UIMenu extends PopupMenu.PopupMenu {
    constructor(sourceActor) {
        // ...

        this._showPointerItem =
            new PopupMenu.PopupSwitchMenuItem(_("Show Pointer"), false);
        this._showPointerItem.connect(
            'toggled', (_item, state) => {
                this.emit('show-pointer-toggled', state);
            });
        this.addMenuItem(this._showPointerItem);
    }

    get showPointer() {
        return this._showPointerItem.state;
    }

    // ...
}
Signals.addSignalMethods(UIMenu.prototype);
Pay attention to the last line. Signals.addSignalMethods() does a bit of magic that lets you use GObject signal methods (connect() and emit()) on plain JavaScript classes. In this case I use it to thread through a signal for toggling the “Show Pointer” switch.
The mouse cursor on the preview is just another St widget. Its visibility is connected to the state of the “Show Pointer” switch:
let cursor = new St.Widget();

menu.connect('show-pointer-toggled', (_menu, state) => {
    cursor.visible = state;
});

// Set the initial state.
cursor.visible = menu.showPointer;
When screenshot UI captures a snapshot of the screen, it will also snapshot the current cursor texture, position and scale. These variables are used to configure the cursor widget so it shows in the same spot in the screenshot UI as where it was on screen:
// Get a snapshot of the screen contents.
let [content, scale, cursorContent, cursorPoint, cursorScale] =
    await screenshot.to_content();

// Set the cursor texture.
cursor.set_content(cursorContent);
// Set the cursor position.
cursor.set_position(cursorPoint.x, cursorPoint.y);

// Get the cursor texture size.
let [, w, h] = cursorContent.get_preferred_size();

// Adjust it according to the cursor scale.
w *= cursorScale;
h *= cursorScale;

// Set the cursor size.
cursor.set_size(w, h);
The scale is needed mainly for HiDPI setups. Clutter operates in logical pixels, which means that, for example, on a monitor with 200% scaling, a widget with a size of 10×10 will occupy a 20×20 physical pixel area. Since get_preferred_size() returns a size in physical pixels, we need to multiply it by cursorScale to convert it to logical pixels.
With this, we have a working cursor preview in the screenshot UI:
How many layers of screenshot UI were used to take this picture?
When writing the final screenshot, we need to composite the cursor texture on the screenshot image. To do it correctly, we need to take into account scale of the screenshot texture, scale of the cursor texture, screen selection and cursor coordinates:
Shell.Screenshot.capture_from_texture(
    // The screen texture.
    texture,
    // Selected area.
    x, y, w, h,
    // Scale of the screen texture.
    scale,
    // The cursor texture.
    cursorTexture,
    // Cursor coordinates in physical pixels.
    cursor.x * scale,
    cursor.y * scale,
    // Scale of the cursor texture.
    cursorScale,
    // ...
);
With this in place, cursor capturing works perfectly across mixed screen and cursor texture scales:
Previewing and capturing the cursor in various configurations
But we’re not done yet! Time for window selection.
In window selection mode, every window gets its own cursor preview sprite since the cursor can overlap multiple windows at once:
Overlapping cursor in screen selection and window selection modes
If you thought scale handling was complicated above, brace yourself because window selection takes it a level further. Apart from the scale of the window buffer (counter-part to the screenshot texture scale from before) and the scale of the cursor texture, there’s also the scale that overview-like window selection applies to windows to fit them all on screen. To handle all of this complex positioning, I overrode the allocate() virtual function of the window preview actor:
vfunc_allocate(box) {
    this.set_allocation(box);

    // Window buffer size in physical pixels.
    let [, windowW, windowH] =
        this.content.get_preferred_size();

    // Compute window scale.
    //
    // Divide by buffer scale to convert
    // from physical to logical pixels.
    let xScale =
        (box.x2 - box.x1) /
        (windowW / this._bufferScale);
    let yScale =
        (box.y2 - box.y1) /
        (windowH / this._bufferScale);

    let cursor = this.get_child();

    // Compute cursor size in logical pixels.
    let [, , w, h] =
        cursor.get_preferred_size();
    w *= this._cursorScale;
    h *= this._cursorScale;

    // The cursor position and size.
    let cursorBox = new Clutter.ActorBox({
        x1: this._cursorPoint.x,
        y1: this._cursorPoint.y,
        x2: this._cursorPoint.x + w,
        y2: this._cursorPoint.y + h,
    });

    // Rescale it to match the window scale.
    cursorBox.x1 *= xScale;
    cursorBox.x2 *= xScale;
    cursorBox.y1 *= yScale;
    cursorBox.y2 *= yScale;

    // Allocate the cursor.
    cursor.allocate(cursorBox);
}
Finally, we need to pass these values to the recording function in a similar fashion to what we did before:
Shell.Screenshot.capture_from_texture(
    // The window texture.
    texture,
    // Special values that mean
    // "record the whole texture".
    0, 0, -1, -1,
    // Scale of the window texture.
    window.bufferScale,
    // The cursor texture.
    cursorTexture,
    // Cursor coordinates in physical pixels.
    window.cursorPoint.x * window.bufferScale,
    window.cursorPoint.y * window.bufferScale,
    // Scale of the cursor texture.
    cursorScale,
    // ...
);
Phew! Now we can lean back and enjoy window screenshots with cursor working perfectly across various screen, window and cursor scales. Don’t forget the cursor can be toggled on and off after the fact—this is what all the trouble was for!
Cursor capture on window selection
With pointer capturing implemented (although with some minor bugfixes still due), the next step is screen recording. You should be able to select an area, a monitor, or a window to record, optionally with a cursor, and start the recording. The design for what happens next is not finalized yet but a natural place to put the recording indicator and the stop button seems to be the top-right menu on the panel.
Thanks for getting all the way through the post and see you in the next update! By the way, check out my GUADEC intern lightning talk about the new screenshot UI in this YouTube recording.